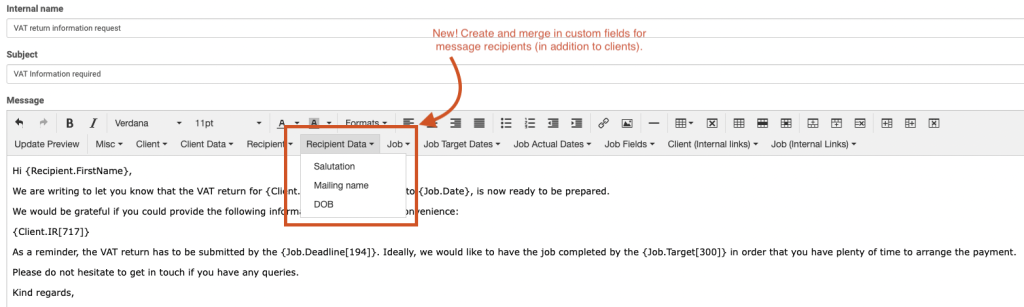
This weekend we have released an update which allows Glide users to merge custom data fields that draw data from the recipient, into message templates. Previously, custom data fields were available for the client but not the recipient.
This means that within a single email template, you can merge in custom information about both your client and the recipient, which of course may be different, such as when a director receives an email in relation to the company.
The most obvious way to use this new functionality would be where you have a salutation field on your contacts because you do not want to address them with their formal first name.
The concept of the recipient becomes relevant where you are:
- Directing your messages using the tagging structure, as opposed to choosing the alternative setting of ‘Basic search for client email/mobile’, and
- Where you are applying those tags to linked contacts, as opposed to self tagging. With self-tagging, the recipient is the client.
As a reminder, here are the 3 main benefits of applying tags to linked contacts in relation to message sending: - Firstly, you can ensure all of your messages are sent to an individual. It is individuals after all that open and read messages. Lots of emails will relate to a company, by linking and tagging contacts, you can choose which people specifically should receive the emails. It might be that a certain director should receive Corporate tax messages but bookkeeping info requests need to go the bookkeeper. Each email automation can target a different tag.
- Secondly, you can send your messages to more than one individual. If there are two directors that need to receive Accounts filing reminders, then simply tag both of them.
- Finally, your tags can also act as a filter. Suppose you would like to trigger a message whenever payroll is submitted, but this message only applies to a sub-set of clients. By targeting a tag, and only applying the tag to relevant clients, you can ensure that only relevant clients receive the message without needing to build options into the workflow.
Another example of filtering is where you have multiple versions of the email template for different cohorts of clients. You can simply set up multiple automations and in each case target a different tag. Simply apply one of the tags to each client, the appropriate one, and they will receive the correct version and none of the others.
To make the most of these new settings, you should set up some custom fields that appear on your contact records. You can use all of the usual field types, including the recently added formatted text field type. Here’s an article explaining how to set up new fields.
We believe this will help even more Glide users unlock the value of fully automated communications. Please do get in touch with the Glide Team if you require any assistance in using the message automation features.
