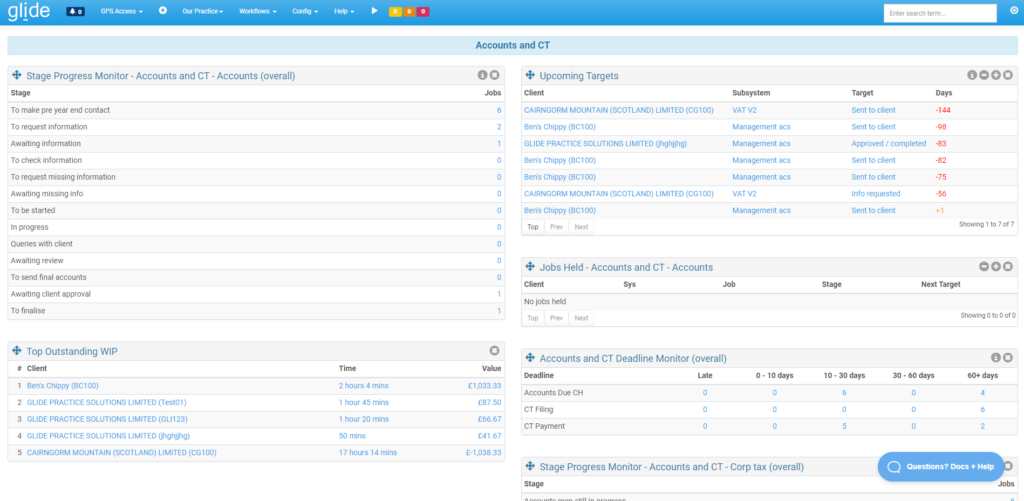
A member of your team logging into your workflow system and seeing a relevant and accurate dashboard, from which they can clearly see upcoming and ongoing client jobs, prioritised such that they can effortlessly deliver a consistently high service, is a great ‘end goal’ for your workflow system implementation.
Dashboards are a highly effective way for busy team members to quickly access both the important answers they seek and, perhaps more importantly, information on upcoming priorities they had yet to really consider. That said if the underlying configuration has not been properly thought out then the value is destroyed, here our 5 top tips for success:
- Prior to setting up dashboards, invest most of your time configuring your workflows to suit your EXISTING business processes. Rolling out a new system inevitably brings some change. If you can create a highly bespoke feel, where all the quirky things you do and the terminology you have always used is fully reflected, then users will feel at home in the new system and will be able to use the dashboards how they are intended. The dashboard is after all only as relevant as the underlying system it represents.
- Ensure those with responsibility for a portfolio of clients can clearly see results filtered to show their client portfolio, regardless of who is working on the job. So if Mr X is set as the Client Manager on 300 clients he should see the status of these clients’ jobs by default when his dashboard loads. Of course you could have a second widget or second dashboard filtered to the office or overall business, but this is unlikely to be the best default view.
- Ensure those proactive ‘early’ steps (that are typically more at risk of slipping through the net) are highlighted on the dashboard at the optimal moment. For example if your firm strives to call clients at least 60 days in advance of their year end then do the following:-
- Firstly ensure that your Accounts jobs are set to auto-create at this point or earlier, I’d suggest at least 10 days earlier to give the user time to see the job and plan a time to make the call.
- Have the jobs sit on a stage called something like ‘Pre year end client contact’.
- On job creation have a target date automatically set for Year End minus 60 days.
With the above configuration and with a dashboard set up with the 3 widgets I recommend below, users could then observe the following:
- The jobs will have increased the number of jobs on the ‘Pre year end client contact’ stage, this is most likely the top row on the progress monitor widget. In this case it is highly visible because it is likely the day before creation the stage will have had 0 jobs (i.e. because this probably happens once a month and you then call the clients within the 10 days meaning the number of jobs drops to 0 before the new ones create).
- With the target date set you’ll also see the job in the Upcoming targets widget. This will start out with a green + 10 (to reflect the 10 days to go until the target) and each day that passes without the stage being passed will see the number drop, turning red and eventually hitting 0 days. Of course by this time the action will have been carried out avoiding any negative / overdue jobs.
- You could also make the relevant job position (e.g. manager) the job holder on job creation. They could then have both an overall ‘Jobs held’ widget and maybe an Accounts specific ‘Jobs held’ widget on their dashboard. These widgets list relevant jobs where they are held by the user, essentially giving a personal to do list, and again they list them in next target date order.
With auto job creation and all of the above dashboard visuals, it becomes as good as impossible to miss these early tasks that are essential to customer service. If you feel you still need more reminders then you could also trigger an e-mail alert to the manager on Year end minus 65 days filtered to only send if the task has yet to be completed.
- Highlight emerging problem jobs. Widgets such as Top outstanding WIP can compare work in progress / time spent (if you use Glide’s Time recording add on) to spot where jobs are going over budget.
- Use multiple dashboards. Don’t confine users to a single dashboard, this can get too busy. Popular approaches include having a dashboard for each workflow system e.g. ‘Accounts’, ‘CT’, ‘Payroll’, ‘Missed calls’ etc, grouping workflows into related areas such as ‘Year end work’, ‘Monthly recurring work’ or having a dashboard dedicated to each of our filter levels e.g. ‘Overall business’, ‘My office’, ‘My portfolio (aka linked)’ and ‘My current workload (aka held).
Please do get in touch with the Glide Team if you require any assistance setting up dashboards.
Please also take a moment to read our other blog announcing the release of template dashboards which eases the process of setting up dashboards on new users.


