Overview:
Glide’s e-mail and SMS sending features have been radically upgraded, now offering the ability to create templates that include fields representing all of the data stored against your clients and jobs.
As before messages can be triggered via a workflow action (i.e. to advise of job progress) or via a job date or deadline alert and now we have also added a bulk operation on the client list report. Soon a bulk operation on the jobs report will follow too.
At the same time we have released our contacts database which allow you to store multiple contacts against each client, you can tag each contact/client link with multiple (fully configurable) tags and target e-mails and SMS messages at certain tags.
These new features have been developed in response to user feedback and in conjunction with some of our existing users, we are certain they will prove very useful. For those firms that spend a lot of time on basic communications such as deadline reminders, chasing information and queries the templates will save a lot of administration time. For those clients that are keen to be able to provide an e-mail/SMS based transactional update of job progress Glide will now fully cater for this.
We’ve recorded a 10 minute video that gives an overview of the system (below) and have new videos on the feature on our YouTube, our user manual has also been updated. If you would like to read about the system in more detail just scroll down or please do arrange a personal demo with the Glide team.
Templates and fields:
To create your first template click on the menu labelled with your business name and you’ll now see ‘Glide messenger centre’. If you don’t yet have a Glide system, just create a trial system here.
You’ll see various green buttons to create templates linked to a particular workflow system or simply to the client record. The job templates are the most interesting, the ideal way to keep clients up to date with job progress, to chase information and alert clients to upcoming jobs/deadlines.
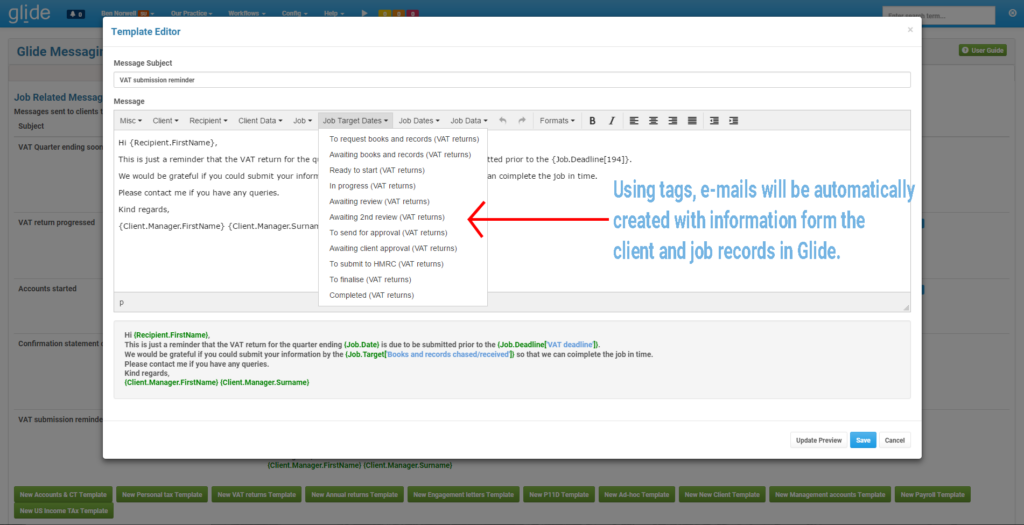
The precise tags you’ll see depend upon your system but I’ve summarised quickly below:
| Misc | References to the date/time and some generic ways to open an e-mail e.g. ‘Good morning’ which are useful if you can’t use the recipient tags. |
| Client | Here you can pull in the client name and information about the user that is the manager/partner on this client. |
| Recipient | Refer to the first and last name of the actual recipient. The recipient tags take advantage of our new contacts feature explained in full below. |
| Client data | Pull in any information from the client record including any custom fields you have created. |
| Job | This is a key section -> pull in the job date (e.g. Year End, VAT quarter end etc) as well as any deadlines that exist, for example the Companies House filing deadline, VAT submission deadline etc. You can also pull in the current job holder from here. |
| Job target dates | Include any of the target dates from your job card. If using a template on an alert be sure that a target date will exist when it is sent.
This could be useful where you set a target date for when you intend to start a job or review a job, you can ask the client to provide information or respond to queries in advance of that date. |
| Job actual dates | Include any of the actual dates from your job card, this might be useful where you are chasing data ort queries, you can refer to the original date that you sent the request etc. |
| Job data | Here you can pull in any of the fields on your job cards including any custom fields you have set up. Currently this is limited to Boolean fields but all other data types will be supported shortly. |
Triggering E-mails and SMS:
You have four different methods to trigger e-mails and SMS from within Glide, two of them are fully automated and two involve manual steps but offer significant time savings over traditional business processes.
1 -> Alerts:
Alerts can be set up in relation to any deadline or the job date. For example you may have an alert set to fire automatically 10 days before the VAT deadline or 20 days after the Year End. Alerts linked to deadlines can either fire all of the time or just when the deadline is incomplete.
Alerts can use any of your templates and can be targeted at any of your contact tags.
This video guides you through the process of setting up an alert.
2 -> Workflow actions:
Those familiar with Glide will know that any progress button can trigger any number of workflow actions. A new workflow action now allows you to trigger an e-mail that uses a template you have created. This is ideal for giving updates on progress so that your clients remain fully updated throughout the life of a job. For example…
“Dear John, The John Ltd VAT return for the quarter ending 30 April 2017 has been reviewed by our VAT specialist Kevin. Please contact kevin@xyzAccountants.com to arrange a call at some point in the next week. The deadline for submission is the 7th June 2017 so we shall need to finalise the return by the 31st May 2017”.
All of the recipient, name, date and staff fields can be populated dynamically using Glide’s templates. It can also be used effectively to chase up information and queries, for example on the stage ‘Awaiting client information’ you might have two progress buttons, one called ‘Info received’ that simply moves onto the next stage, sets a target and passes the job to the preparer and one called ‘info chased’. The latter button could trigger an e-mail such as….
“Dear John, We wanted to remind you that your VAT return for the quarter ending 30 April 2017 is due for submission on the 7th June 2017. We contacted you previously on the 20th April but do not appear to have received a response just yet. Please remember that wee can only guarantee on time completion of your return if we receive your information by the 20th May 2017. Please contact Bob if you have any queries.”
Remember that both alerts and workflow actions are specific to a workflow route so it is entirely possible to have different variations of the route for different groups of clients, for example ‘A clients’ and ‘B clients’ or ‘external books’ clients and ‘internal bookkeeping clients’.
This video guides you through the process of setting up a workflow action:
3/4 -> Bulk operations:
Finally you can manually trigger the sending of e-mails in bulk. Once you have a list of relevant clients/jobs you choose a tag and a template and Glide will generate and send all of the e-mails.
This is available immediately on the clients report. You can filter your clients down using the filters and further filtering can be achieved by using the tags (see below) to target only certain clients.
The next update of the e-mail system will see a similar bulk operation added to the job screens for every workflow system. This is expected to be really powerful for those firms that want to be able to automate their existing processes of ah-hoc bulk chasing etc. For example on the jobs reports you can very quickly filter to show say Accounts jobs where a certain stage has yet to be passed, where the deadline is in x days and where the manager is Bob. If the result set shows 30 jobs you would then be able to trigger a very personal e-mail to all of them.
Contacts and tagging:
Glide has historically allowed an e-mail address and a phone numbers to be stored against each client, many firms have created secondary fields for supplementary addresses and numbers; however, this was not previously managed in a formal way.
With the introduction of the far more enhanced e-mail and SMS alerts we needed to allow users to target very specifically the correct person(s) at a client. We have therefore simultaneously added a contacts database which will allow for multiple contacts to be created and linked to multiple clients.
All individual clients on your system also now act as a contact, in addition you can add extra contacts that are not otherwise clients. Every contact can have an e-mail address and a phone number and every contact can be linked to as many clients as required. In time the existing clients links system will be absorbed into the newer links interfaces and as part of that we shall create a routine for existing links to be converted to avoid duplication.
In addition to a more organised contact database the most important aspect is the ability to create tags and tag the relationship between a contact and a client. For example suppose on a Limited company client you have 3 director as ‘client contacts’ and a bookkeeper as a ‘pure contact’. You might tag all 3 directors as ‘Owner’ but only one as ‘VAT’ and a separate one as ‘Payroll’, you might also tag the bookkeeper as both ‘VAT’ and ‘Payroll’. When you are sending any e-mails through Glide you can target a specific tag. This means you can decide exactly who should receive e-mails, you can ensure multiple people at one business receive the same e-mail (though each can be personalised using the ‘recipient’ tags) and you can also target and exclude specific clients in bulk e-mails by simply targeting a tag that only exists on certain clients, such as ‘R&D’ or ‘Married’.
This video looks at the contacts and tags system in detail:
Further info
Please do create a trial system and have a go with the new e-mail and contacts systems. If you have any queries at all please do get in touch with the Glide team on 01733 602 280 or feel free to set up a webinar so we can help you with any queries or provide a demonstration.
The Glide Team


